I wrote this post after Bob’s 2nd birthday party but I didn’t know if it was too complicated to post. I would love to start sharing how I make my special cakes with you but I am not sure if you will be able to follow my waffle. I’d love to know your thoughts as I have a Lightning Mcqueen cake that I could share with you and I will soon be making a fairy cake! What do you think? Does this mammoth post make any sense?
How To Make A Clown Birthday Cake
I make lots of sugar craft creations but I have never written a how to post as they can be quite complicated. I think I have chosen my most detailed model to use for my first how to post.
When I make cakes I like to do as much of the decoration as I can in advance. I don’t trust my skills enough to leave things until the last minute. The beauty of sugar craft is that you can make the models in advance. Then, near the party you can simply ice a cake and plonk them on top. That was my plan at least until I started to over complicate things. 😉 As I had made the figure in advance I decided to make the cake a bit more interesting and ended up making this.

Here is how I did it.
The Clown
You will need:
* White Icing and colouring or pre coloured icing. (When colouring I use the powder colours as I find that they work better than the liquids.)
The amount of icing will depend on the size of clown that you want to make. My clown was about 15cm high and I used a 500g pack of regal icing and had plenty left over for Bob to play with.
Gum Tragacanth (I use this to stop the icing being too soft to manage and the figure from sinking. You could probably make him without but, if you do, I would give the trousers, the upper body and the head time to harden before assembling.
* Dried spaghetti
* Edible glue (you can buy this or make it using sugar and water, see Clown Cupcakes for directions).
* Cornflour (use this to dust your worktop and your hands when mixing colours).
* A small paintbrush
* A garlic crusher or a play dough hair maker. – I think that’s the technical term. 😉
* Small star cutters
* Small flower cutter
* Sugarcraft wire (if you would like the clown to hold stars or flowers).
Method
* Sorry for my random way of telling you the sizes. If I had been clever I would have weighed each piece of icing to give you an exact amount. Unfortunately I am not that bright! 🙂 I also wish that I had taken more photos of the process. As I was making it up as I went along I occasionally got lost in the icing and forgot about the photographs.
1) Add the gum tragacanth to the icing. (I use 1 teaspoon for every 250g of icing.) Wrap the icing in cling film and leave for 1 hour.
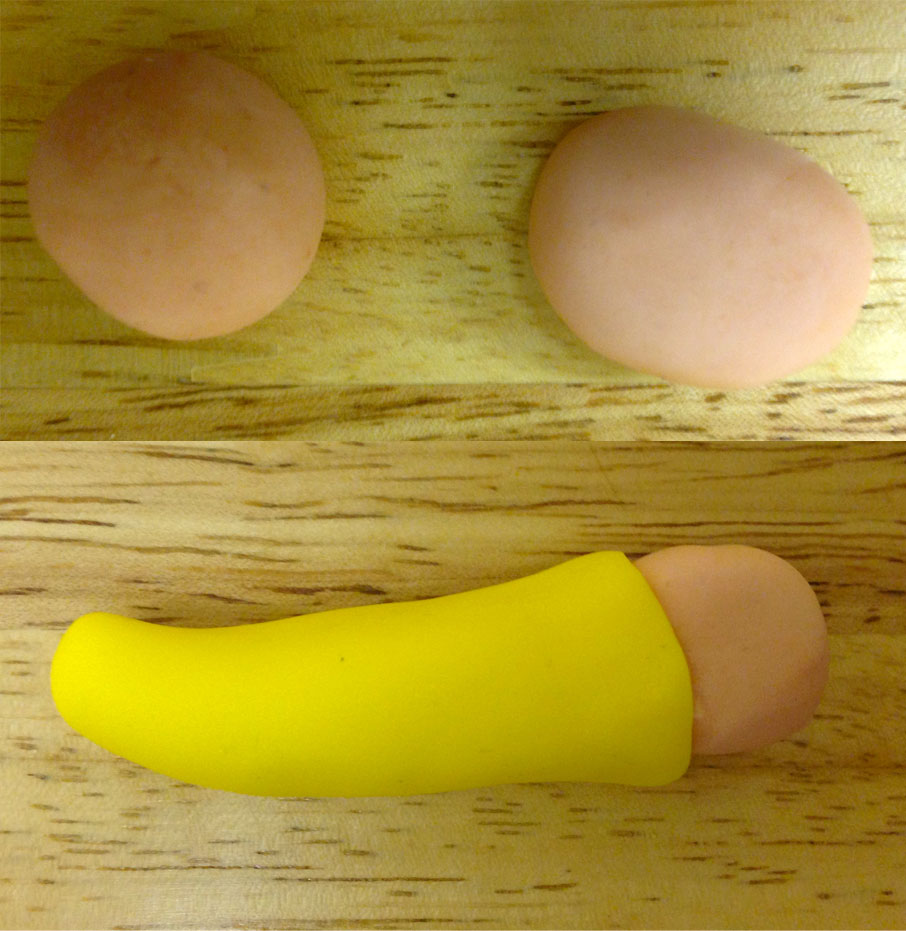
2) Take a piece of icing about the size of a golf ball (for the head) and two pieces about the size of malteasers (for the hands). Roll the pieces together and colour with a skin tone. Once the colour is evenly mixed separate the icing into your original 3 pieces roll the larger piece into a ball for the clown’s head and wrap the smaller pieces in cling film to use later.
3) Take a piece of white icing about the size of a small apple (I told you my measurements were strange) and colour red.
4) Roll a ball the size of a malteser for the nose and a thin sausage shape about 2cm long for the mouth. Wrap the rest of the red icing in cling film for later.
5) Break off a 2cm piece of spaghetti and push this into the clown’s head, where you would like his nose to be. Leave 1/2cm sticking out.
6) Brush edible glue onto the head, around the spaghetti that is sticking out and then push the nose onto the spaghetti.
7) Paint a curved line of edible glue, beneath the nose where you would like the mouth to be and press the smile in place.
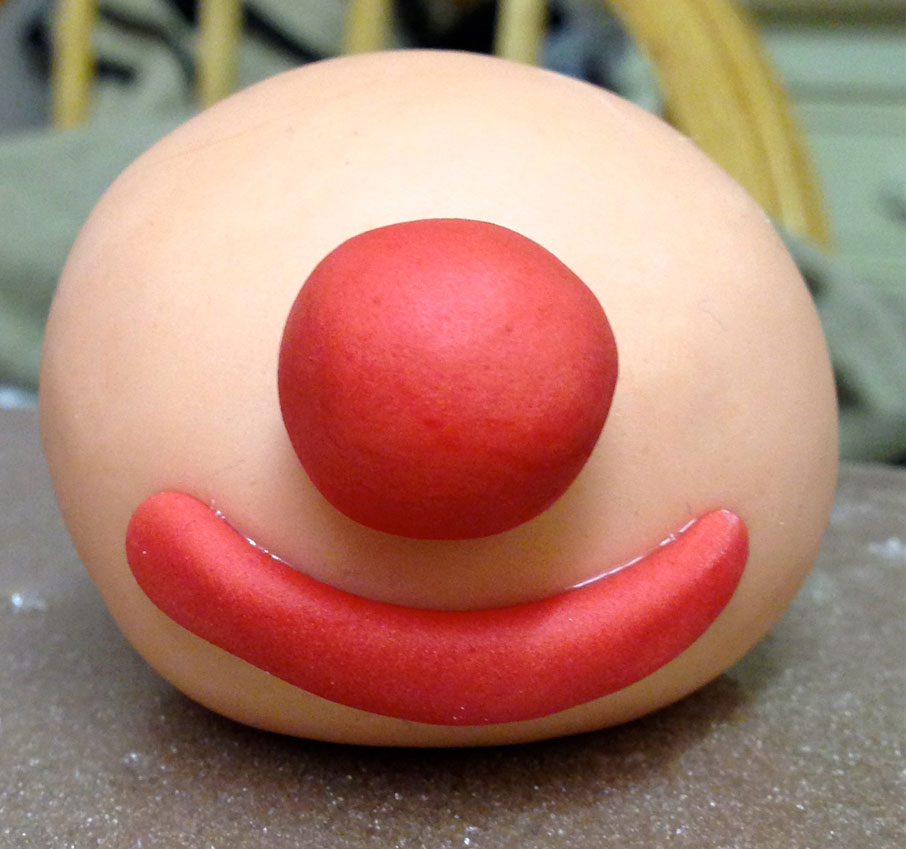
8) Take a piece of white icing the size of a large apple 🙂 and colour this blue. Take a small piece of icing, and roll 2 little balls about 3mm in diameter and wrap the rest of the blue icing in cling film for later.
9) Colour a tiny piece of icing black and roll 2 balls about half the size of the blue ones.
10) Take some white icing and roll 2 balls slightly bigger than the blue ones. (This will all make sense soon I promise!)
11) Lightly dust your worktop and your fingertips with cornflour and press each ball to make a circle (2 black, 2 blue & 2 white).
12) Using edible glue stick the blue circles onto the white circles and the black onto the blue and you should have some eyes! 🙂 Stick these onto the face.
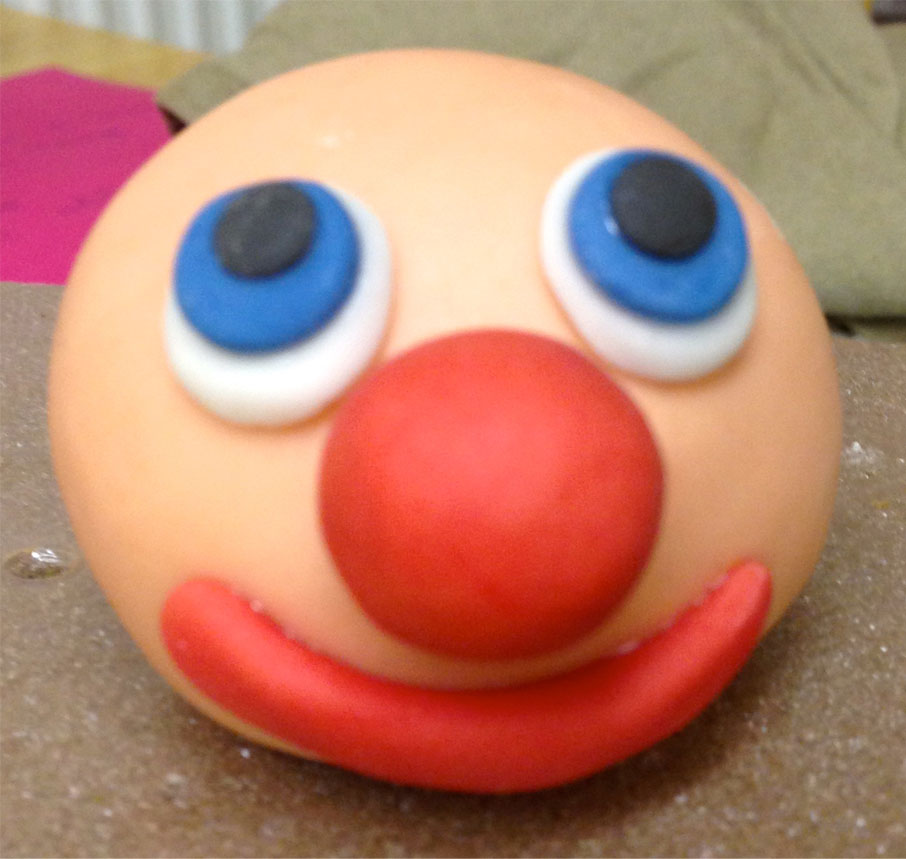
13) Colour a golf ball sized piece of icing green. Push this through a garlic crusher (or I stole Molly’s play doh tool) to make long strands. Cut the strands into 3cm pieces.

14) Brush edible glue around the sides of the clown’s head and stick on the strands of hair. Wrap up any left over green icing for later.
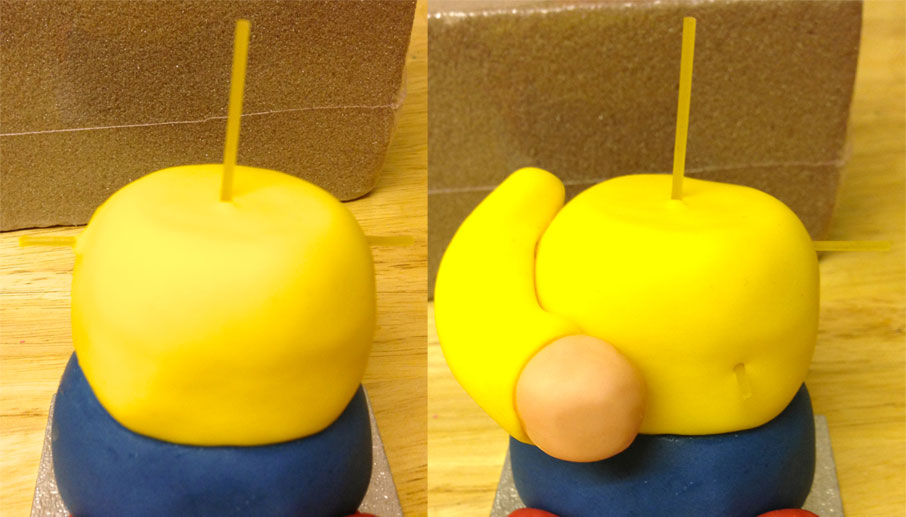
15) Take a piece of icing the size of a very large apple 😉 and colour this yellow. Make a circle that is slightly wider than the clown’s head, using the same method that you used for the eyes. This will make the brim of his hat.
16) Roll a ball of yellow icing and flatten one half of it to make the top of the hat. When one side of the ball is flattened this shape should not be as wide as the brim. Wrap the rest of the yellow icing up for later.
17) Glue the brim onto the clown’s head and the top of the hat onto the brim.
18) Colour a small piece of icing orange. Roll a thin sausage shape that is long enough to wrap around the hat. Glue this in place and wrap up the rest of the orange icing for later.
19) Colour a small piece of icing pink and cut out a small flower shape. Stick this onto the hat and then roll a tiny ball of white icing and stick this in the centre of the flower.
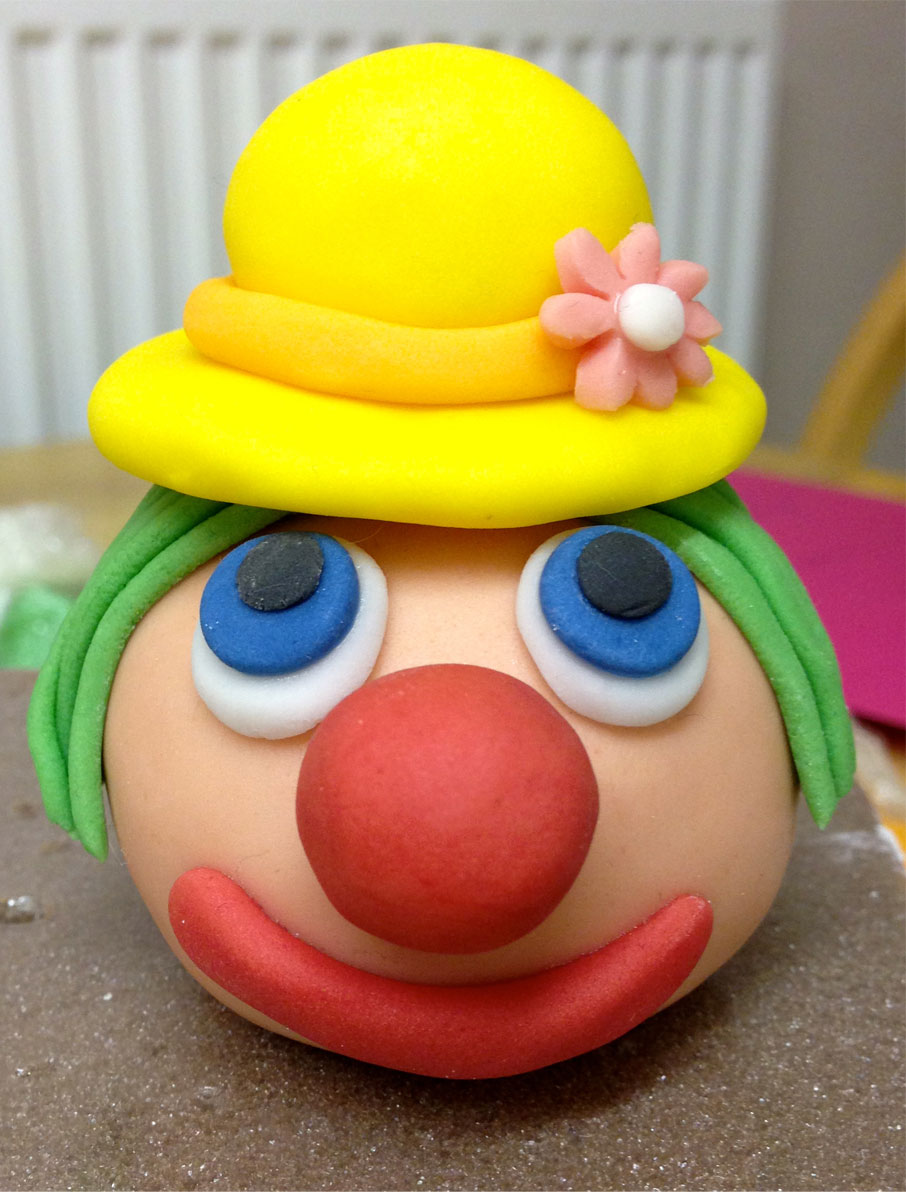
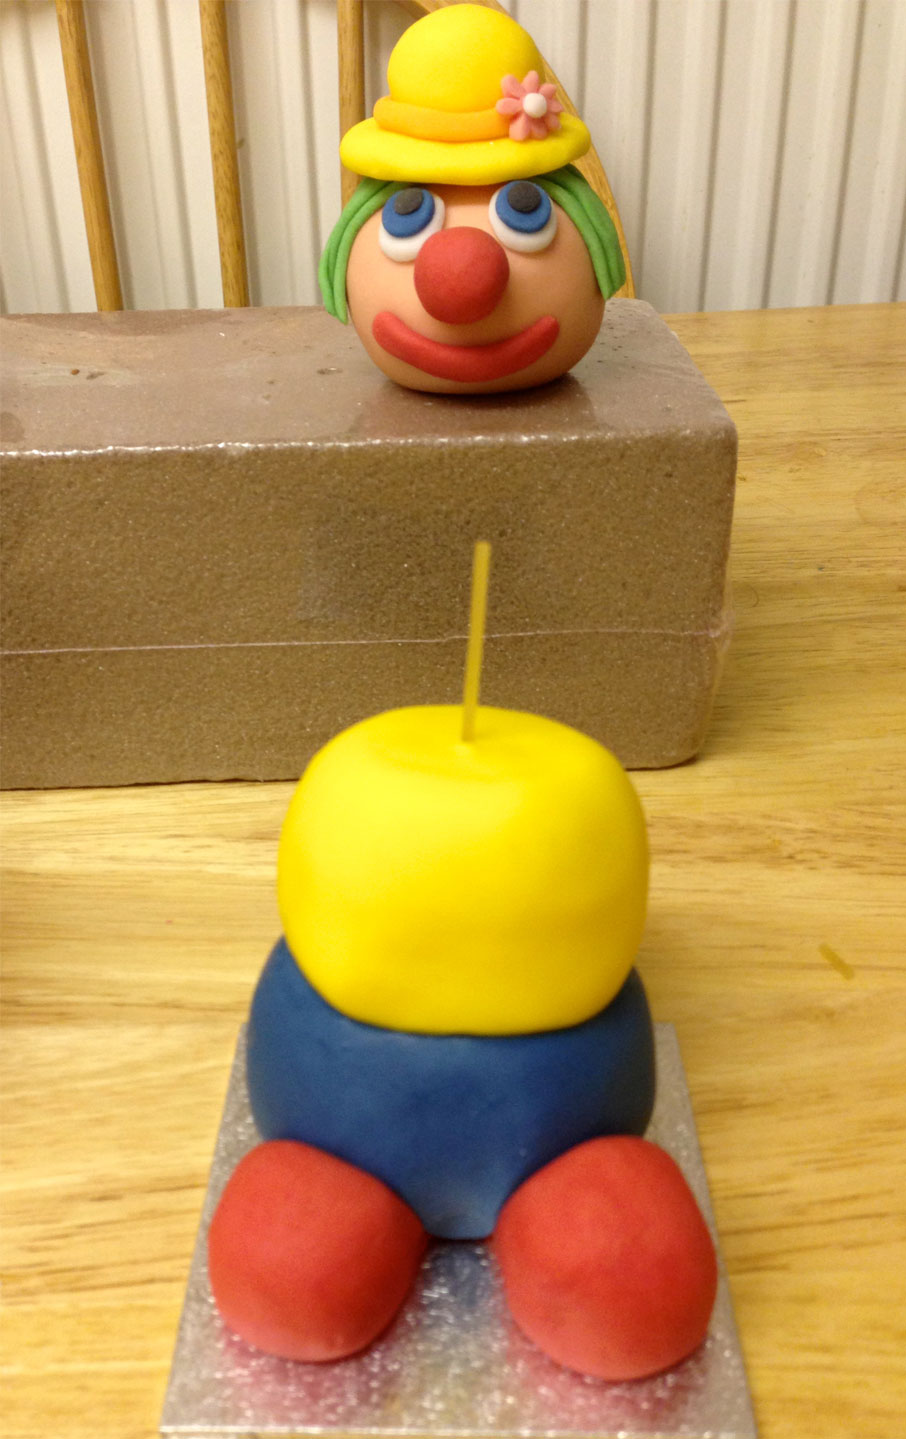
* Your head in complete! I took a break at this point and finished the rest of the clown the following day. If you are going to do this push a piece of spaghetti into the bottom of the head. You will be using spaghetti to secure your head and your body so you do not want you head to dry without making a spaghetti hole first. I then pushed the other half of the spaghetti into a piece of oasis, the kind that is used for flower arranging.
20) Roll the rest of the blue icing into a ball and place it on a flat surface. (I use a tiny cake board but a piece of greaseproof paper on a worktop would do.) Press down to slightly flatten the top and the bottom of the ball to make the clown’s trousers.

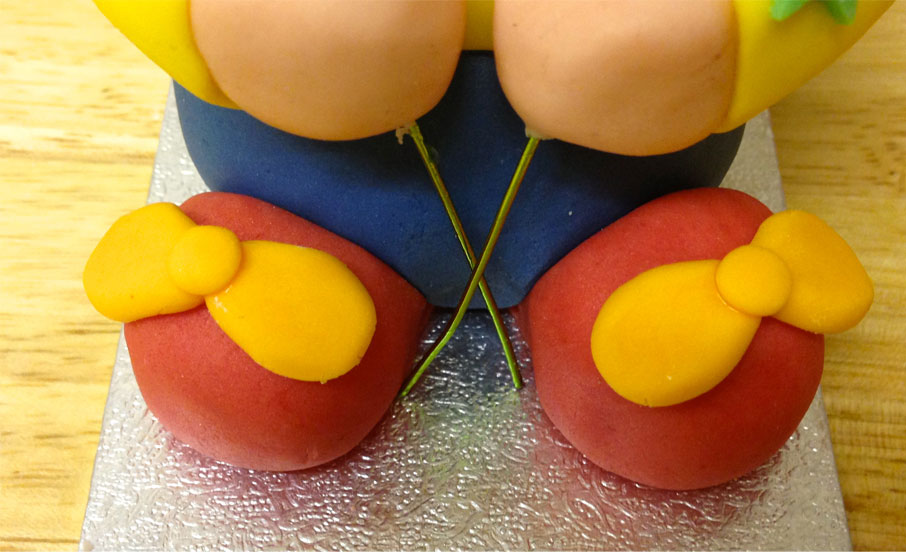
21) Roll 2 balls of red icing about the size of gobstoppers. Flatten the back half of these and glue them to underneath the blue trousers.
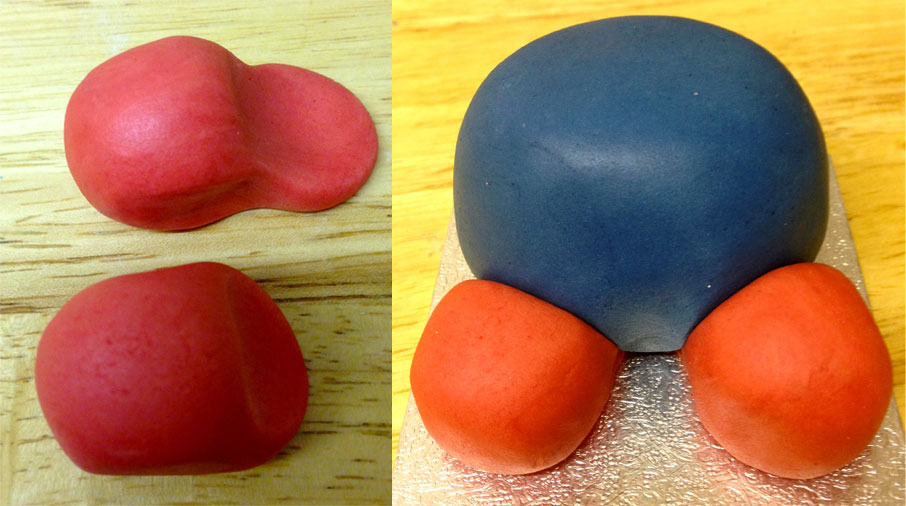
22) Roll a ball of yellow icing, slightly smaller than the blue trousers. Flatten the bottom of the ball slightly and glue it onto the trousers.
23) Push a piece of spaghetti through the yellow and the blue ball and leave a few cms sticking out of the top.
24) Roll 2 yellow sausage shapes for sleeves. Make one end of each sausage into a slight cone shape and flatten the other end. Using the end of a wooden spoon make a hollow in the flattened ends.
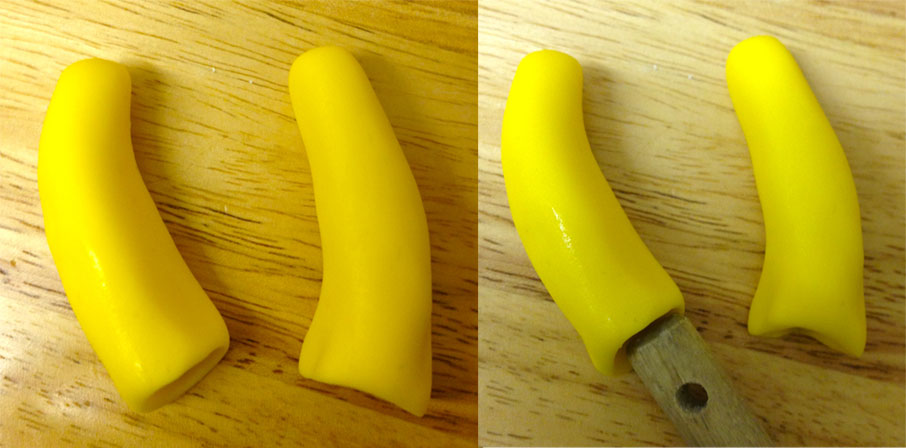
25) Take your skin tone icing and reshape your 2 maltesers. Glue one of these into the end of each sleeve.
26) Glue the arms onto the body, use spaghetti where needed. (I used a piece in the shoulder and a piece to hold the hand to the body.)
27) Cut out small star shapes (I used red and green) and stick them on the clown’s jumper.
28) Cut 2 pieces of wire and push them through the clowns hands. Cut out star shapes or flowers and push these on to the top of the wire. Use edible glue to hold in place if needed.
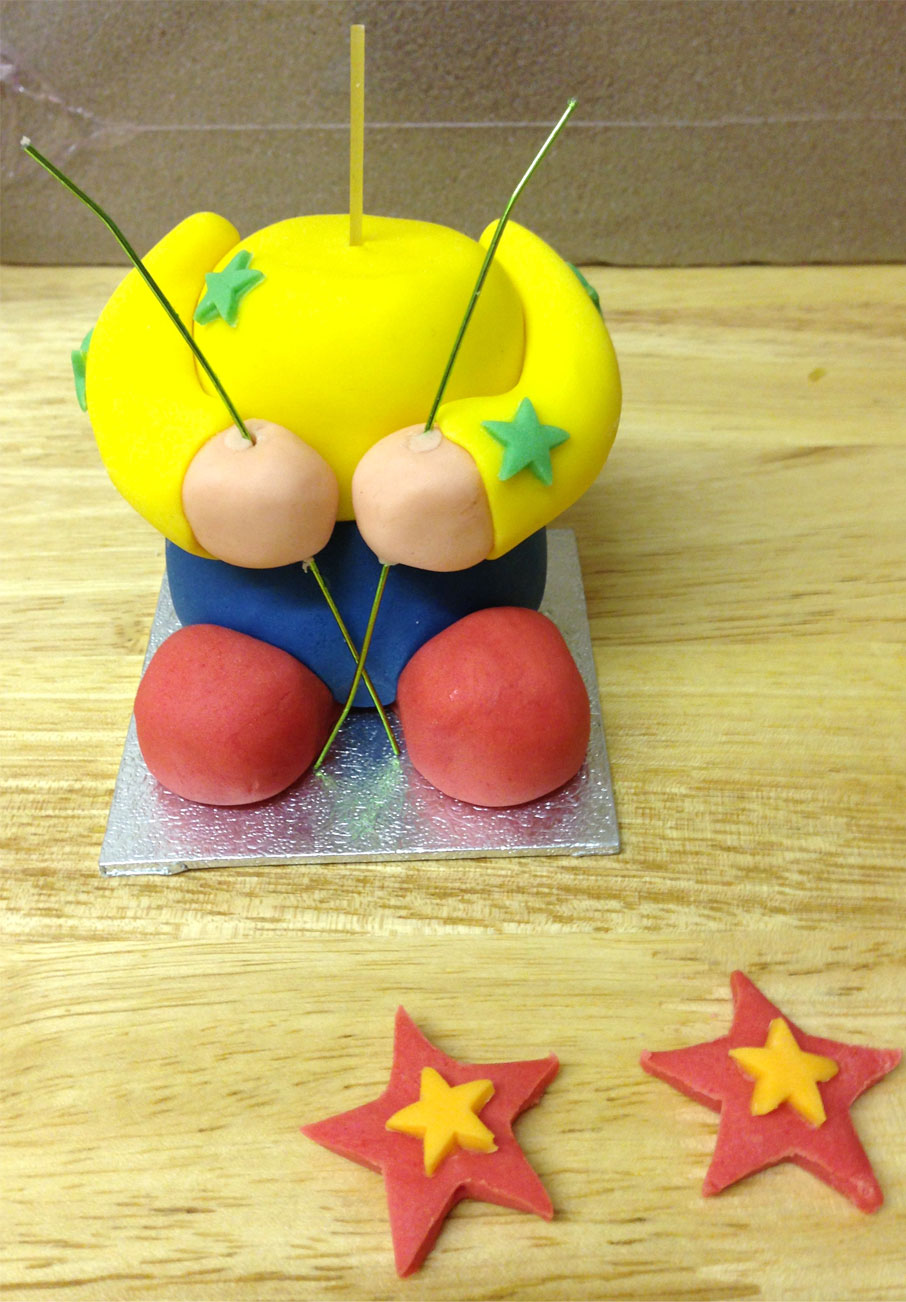
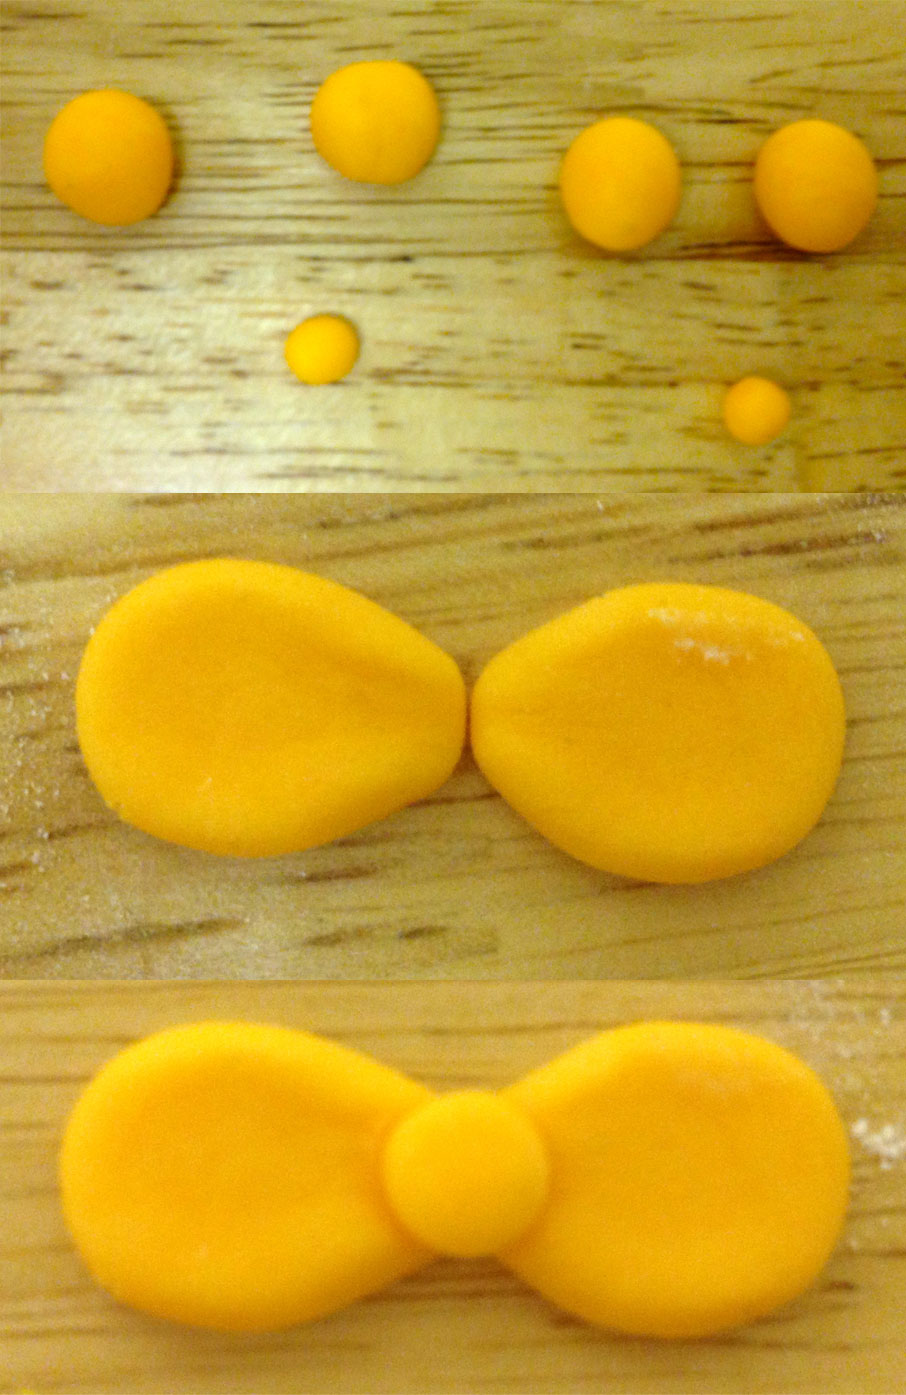
29) Make bows for the clown’s shoes by rolling balls and shaping, see images. Glue these onto the shoes.
30) Glue you head onto the body, pushing the spaghetti into the head or the pre made hole if you took a break.
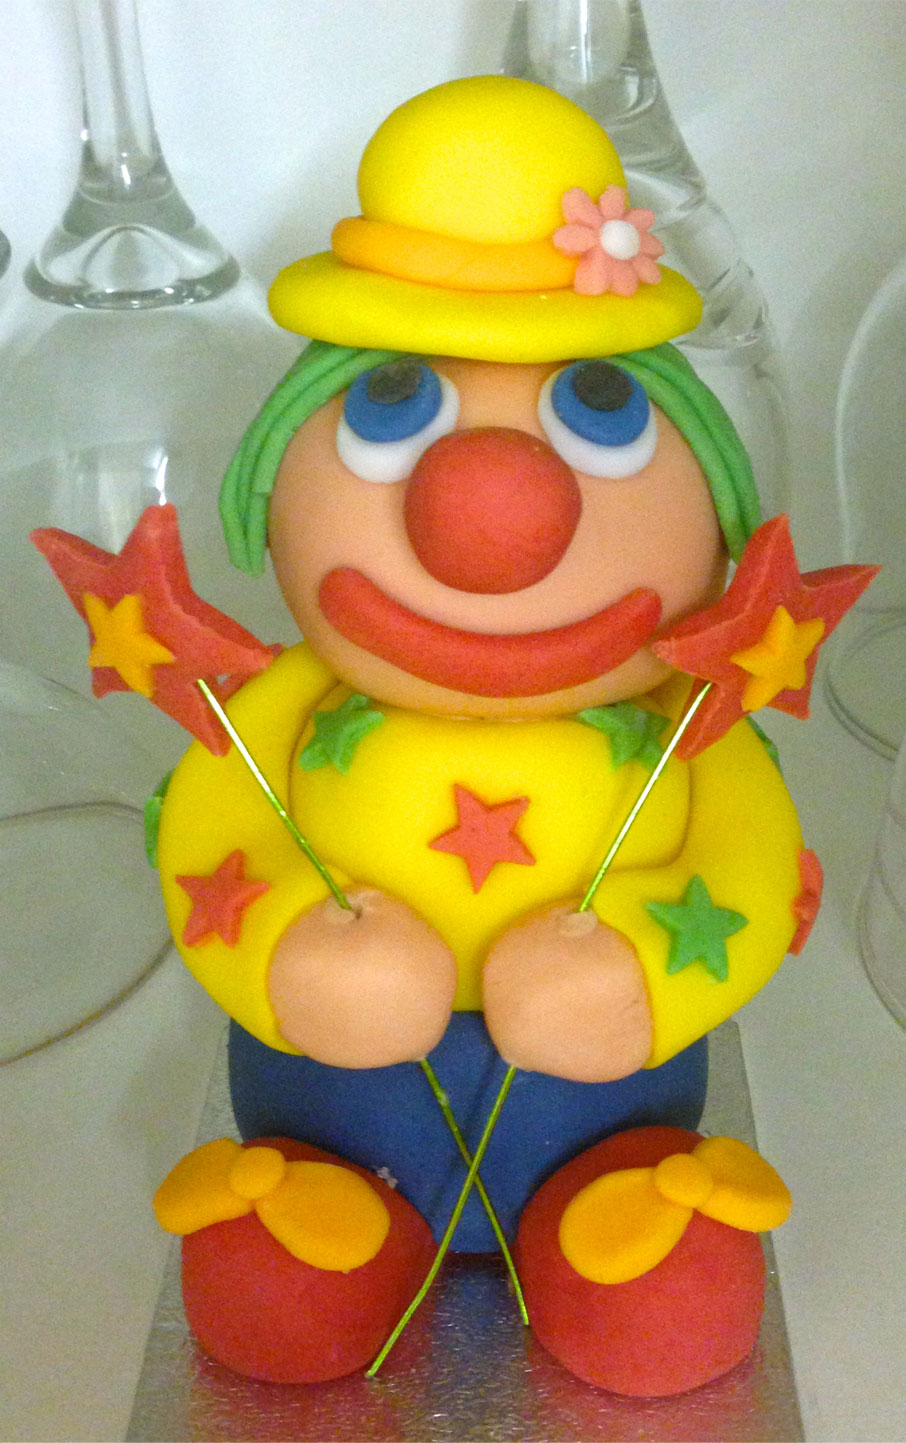
* Your clown is complete!
Many of the colours can be changed to your personal preference.
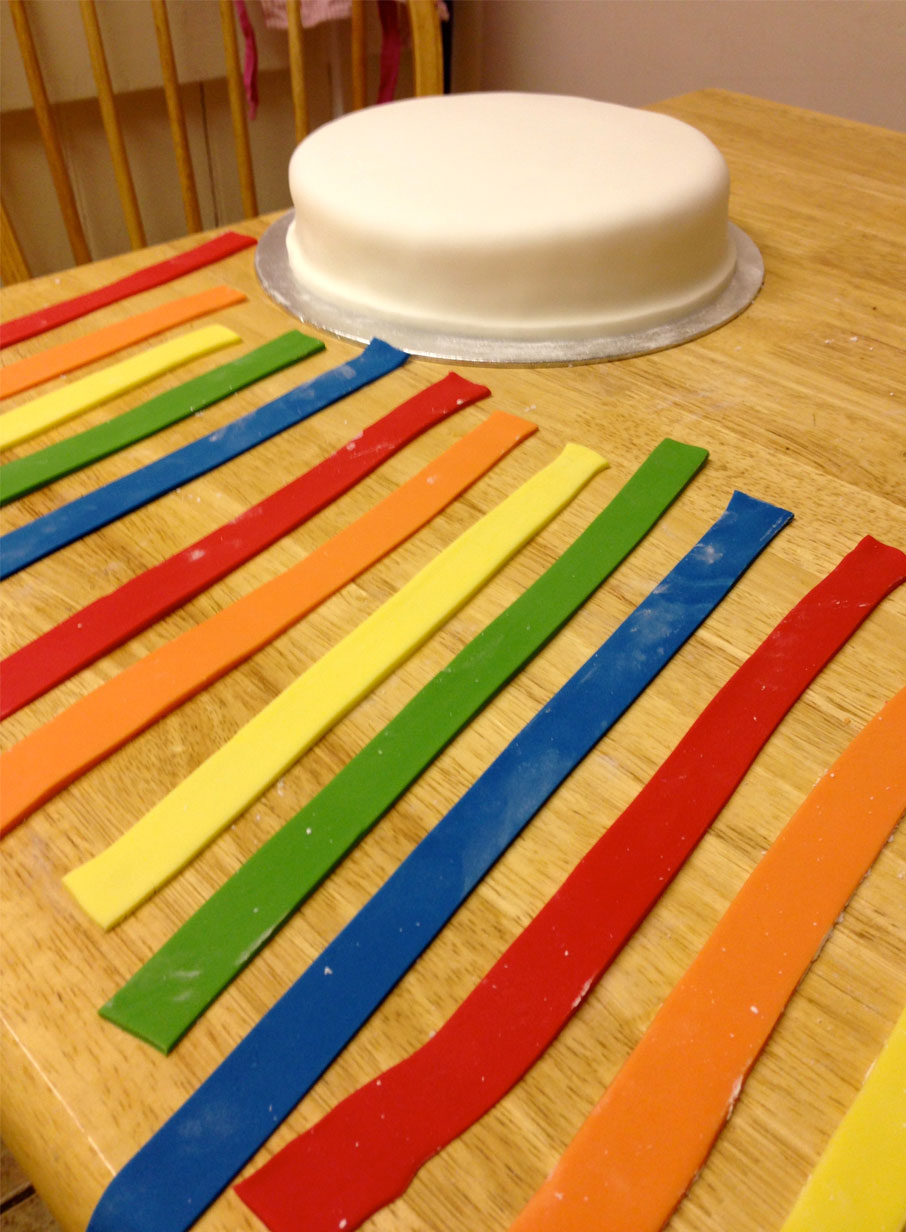
I used the cake recipe from my Strawberry & Cream Cake and I doubled the quantity. This gave me enough for an 8 inch cake and a 6 inch cake. They weren’t very deep but once they were cut in half, filled with jam and cream and iced they were big enough. (Make sure that your cake has fully cooled before you cut it in half.)
I iced both cakes with white icing and used dowelling rods to prevent the top layer sinking. If you would like any advice on this just ask in the comments below. I am no expert but I will help where I can.
I used pre coloured icing for the spots and stripes as I knew I would need quite a lot and I was all coloured out. 😉 I rolled out long rectangles and cut the stripes out with a knife and I used a biscuit cutter for the circles.
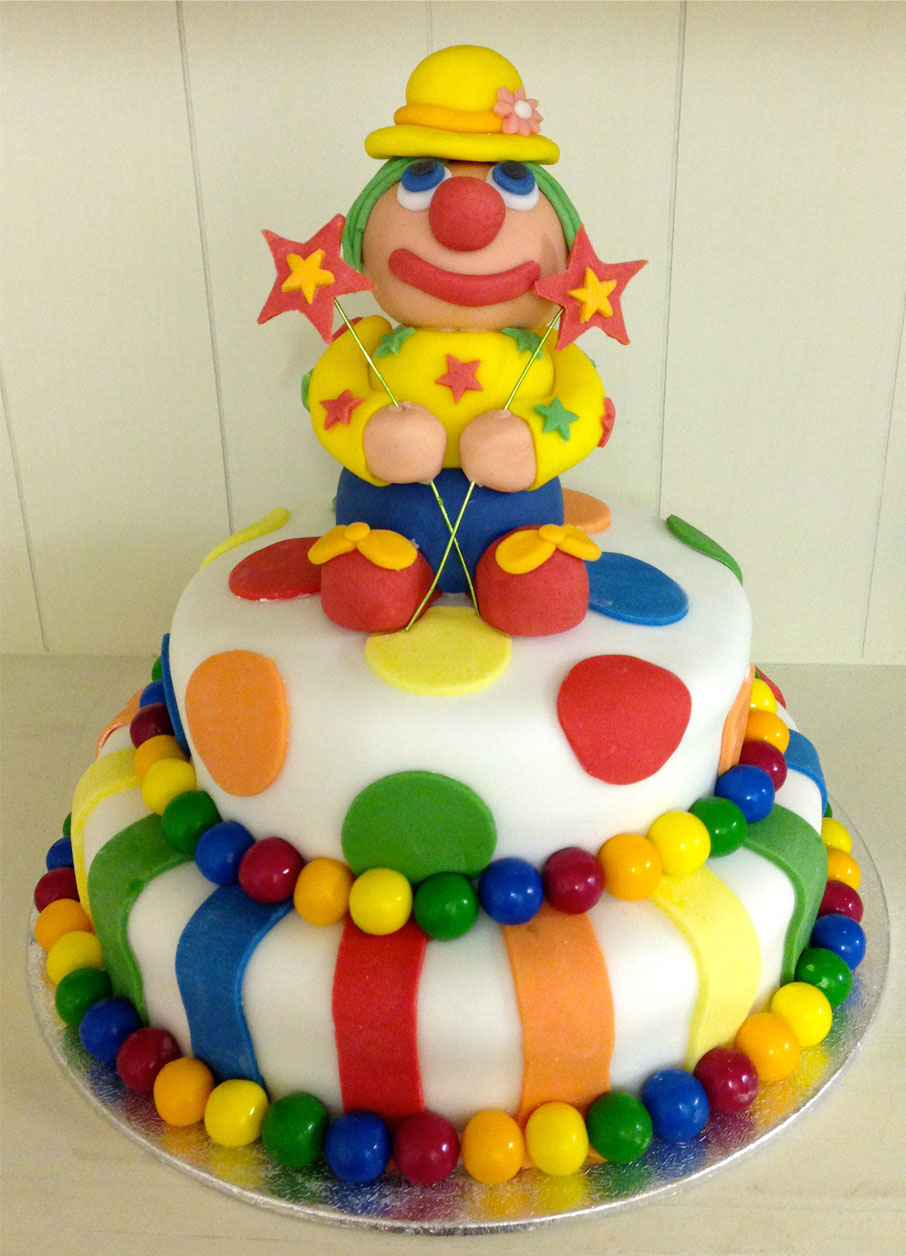
I stuck the spots and stripes on with edible glue. I then used gum balls to decorate the bottom of each cake. (I removed these before giving the cake to children.)

Ta da!
Sorry for the mammoth post! I thought about posting this in sections but then thought if any of you were mad enough to follow my directions that it would be helpful to have them all in one post. 😉


Wow I cannot believe you made this Charlotte- it’s absolutely amazing! How talented are you? x
Wow, wow and wow again! You are amazing. I’d love to make this but fear my skills are limited. I’m so, so tempted to give it my best shot though. Thank you so much for writing it all down. I’ve been dying to know how you did it since you first posted a pic last year x
I so want to make one!!! I love the measurements – easy to follow!!